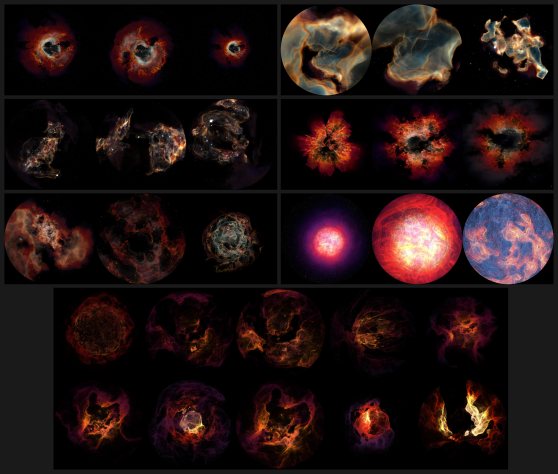
One of the most difficult types of space imagery to create is a volumetric nebula. There are three main styles of nebulae to imitate: diffuse nebulae, planetary nebulae, and supernova remnants. The fluid framework within Maya is extremely flexible but it can be very tricky to just get a fluid/emitter set up with settings that are repeatable.
So to ease the cumbersome setup, below is a maya scene for the interactive creation of a fluid nebula. While experimenting with the attributes it’s important to have a real nebula reference image in mind; or else you’ll just continue tweaking attributes without any real measure of when it’s done. With fluids it’s quite easy to run down endless rabbit holes… There are just so many attributes that are interlocked. But it’s not impossible to tame fluids, you just need to have a goal in mind.
The nebula maker template is initially set up to have the look of a supernova shell because it’s actually more useful to experiment with. But I’ll share how to adjust the opacity ramp to create a diffuse nebula.
Wade Sylvester, a Science Visualizer here in the planetarium, is a master of fluids, particles, and environment creation. All of this work has been pioneered by his endless experiments and dreams. So with this fluid container/emitter you can create a smörgåsbord of nebulae. Below I’ll outline some of the specific attributes to experiment with.
If you find yourself wondering what a specific attribute does then you should check out the fluidShape article. It is very detailed and thorough.
DOWNLOAD
maya scene (using mental ray, vray, maya software) – nebula maker template
Progressive experiments with various attributes.

What’s Going On Here?
Basically the ‘FluidEmitter’ is emitting a very simple fluid into the ‘NebulaFluid’ container. The ‘NebulaFluid’ container then is further refining that fluid with tons of available attributes. So this tutorial is a deep explanation of how to best control the ‘NebulaFluid’ container attributes.
After the fluid is emitted, it can then be shaded by defining its color, incandescence, and opacity. Then you can further refine the look of the fluid by adding a texture. This is a volumetric texture that is cutting out the fluid to make it look irregular and organic. The texture is not created by the emitted fluid, but is instead a separate fractal system overlaid into the fluid.
First Steps
1) Lets make sure you can preview the fluid in the viewport as best as possible. In the viewport menubar: Shading / click ‘Smooth Shade All’ AND check ‘Hardware Texturing’. This really helps to directly see some of the attributes being changed in the viewport.
2) Lets also make sure to let the fluid computation control how fast the timeline moves: Right-click on timeline / Playback Speed / select: ‘Play Every Frame, Free’
3) Rewind the timeline to 1. Then let it play until around frame 18. You’re welcome to explore anywhere in the timeline. But something to remember with fluids is that they have the most intricate of details right when their emitted. So frame 18 is a place where it has nice density and detail.
4) Experiment with the attributes outlined in the tutorial below.
Done? Finalize It
So you’re done experimenting and want to freeze the nebula into place. Now we are going to give the fluid container an initial state and stop emitting fluid.
1) It’s very important to make sure that you have a project set. The initial state is NOT stored within the maya scene file. So if you don’t have your project set, then you will likely lose your initial state when next opening Maya and your fluid will instead look blank.
(example location: project/cache/SceneName.mb_fluidShape1.mcfi)
2) If you want to change your fluid Resolution then this is the last chance. But be sure to re-emit via the timeline!
3) Select the NebulaFluid container. Then in the menubar, go to Fluid Effects and click Set Initial State.
(If this doesn’t work then try: Solvers / Initial State / Set For Selected)
4) Then in the NebulaFluidShape tab of the attribute editor and check the box for Disable Evaluation.
5) DONE! Now you can animate a camera and the nebula is locked in place. If you want to animate the nebula, I would suggest experimenting with Texture Time. But any of the shading & texture attributes are still editable and key-able.
(Note: to see any keyed textures in the viewport, you must have the NebulaFluid selected and the attribute editor open!)
Examples of the different types of nebulae that can be created.

